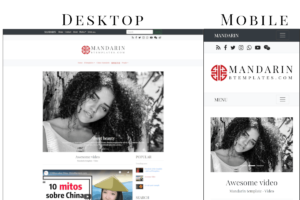
Tutorials, tips and tricks about Blogger

Liquorice is a vintage template based on the theme for WordPress with the same name. Designed by Nudge design and adapted to Blogger by Blog and Web and BTemplates.

liquorice-template-for-blogger

Features

  • Drop down menu made only ​​with CSS.
  • Custom font via Google Web Fonts.
  • Faithful adaptation from WordPress.
  • Color settings from the panel.
  • Static pages menu.

Download

Read more →

iStudio is a template originally designed for WordPress by Xu.hel and converted to Blogger by Blog and Web and BTemplates. A simple, but elegant, clear and functional design.

Features

  • HTML5 Code.
  • Random header.
  • Faithful adaptation from WordPress.
  • Color settings from the panel.
  • Static pages menu.
  • Compatible with modern browsers and IE8 and higher.

Download

Read more →

Blogger starts with the novelties of this year, this time presenting a new gadget to subscribe by email or follow by e-mail as they have called.

How it works

follow-by-email-blogger

When added, it will automatically add the blog to Feedburner, creates the URL of the feed and use it for mail subscription.

follow-by-email-settings

native-blogger-email-suscription

The gadget displays a simple form where the reader can write her email and confirm the subscription. Apparently, the submit button is automatically adapted to the color palette of the blog.

Settings

To configure email subscription I recommend reviewing our guide: How to offer e-mail subscriptions step-by-step.

Widget code

Read more →

Blogger launched at South by Southwest (SXSW), an annual music, film, and interactive conference and festival held in Austin, Texas, its next UI. A new design as well as being clearer, uses the latest development technologies with Google Web Toolkit, as comments Blog Buzz.

New editor interface

(Click on each image to enlarge)
Read more →

The pages widget on Blogger is very useful for use as menu, however, it has a weakness: you can’t add links directly from the panel, but this is possible from the code.

Step by step:

1. Go to your template code (Desktop → Design → Edit HTML) and expand widget templates.

2. Search the pages widget code, it looks more or less as follows:

<b:widget id='PageList1' locked='true' title='Pages' type='PageList'>
<b:includable id='main'>
  <b:if cond='data:title'><h2><data:title/></h2></b:if>
  <div class='widget-content'>
    <ul>
      <b:loop values='data:links' var='link'>
        <b:if cond='data:link.isCurrentPage'>
          <li class='selected'><a expr:href='data:link.href'><data:link.title/></a></li>
        <b:else/>
          <li><a expr:href='data:link.href'><data:link.title/></a></li>
        </b:if>
      </b:loop>
    </ul>
    <b:include name='quickedit'/>
  </div>
</b:includable>
</b:widget>

To facilitate the search, can search with your browser: id = ‘PageList

3. Once you locate the code, there are two places where you can put new links:

  • Before <ul>. The link will be the first one in the menu.
  • After </ul>. The link will be the last one in the menu.

As this is an HTML list, the link will follow this format:

<li><a href='http://mysite.com/mylink/'>My link</a></li>

You can add as many links as the design permits. Always taking care of opening and closing tags correctly.

4. Save the changes.

In this way you can add links to a important label, an external site, the feed url or any other link.

Tutorials, tips and tricks about Blogger